| 1.
Introduction |
|
This Program can
generate signals based on the theories of the
scientist Royal Rife for use as a Rife Machine. It uses a
standard sound card to generate frequencies in 20Hz-22kHz range
and can be controlled by scripts.
|
Main Features:
- Generates frequencies in 20Hz-22
kHz range
- Uses standard sound card
- Selectable left/right/both
channels output
- Selectable sine/square/triangle
wave shapes
- Pulsed signals with variable duty
cycle in 20-80% range
- Dynamic gating and output signal
capability
- Ability to store the frequency
programs in XML and encoded format files.
- Capability to run multiple
frequency programs simultaneously
- Very flexible and intuitive
graphic programming interface
- Fully programmable signal
parameters interface
- Easy accessible help document in
a web browser
- Written in the new Java
technology
|
|
| Back to
Contents Table |
|
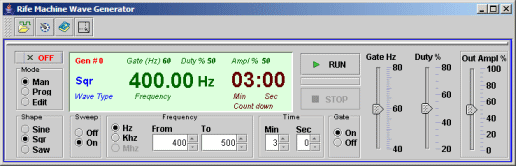
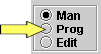
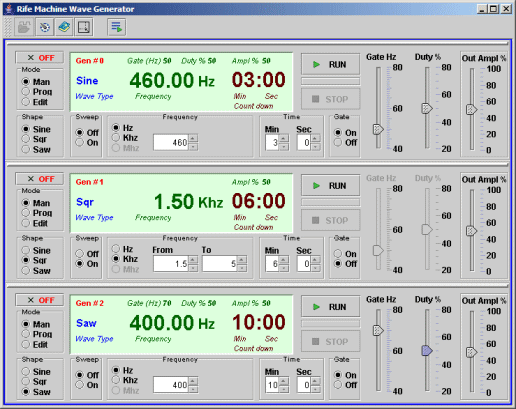
| Generator
mode control |
 |
Man
- manual operation
Prog - program operation
Edit - edit the program scripts
|
|
| Wave
shape control |
 |
Choose
the wave shape of the generated signal here.
Sin - Sine wave
Sqr - Square wave
Saw - triangle wave
Royal Rife did most of his work using square waves, but nowadays others use different waveforms. |
|
| Wave
sweep control |
 |
Off - The
wave is maintained at a constant frequency - flat mode.
On - The wave will logarithmically increase or decrease in
frequency. |
|
| Wave
frequency control |
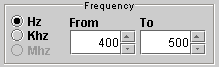 |
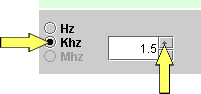
Hz,
Khz and Mhz, - frequency range.
Mhz range is used as generator interface will be used to control
and external oscillator.
From frequency - in flat mode is the constant operating
frequency. In Sweep mode is the starting frequency which will
increase or decrease depending on the ending frequency.
To - the ending frequency, operable only in the sweep mode.
Note: the From and To frequencies are operable only within the same
range selection.
The controls can be adjusted by clicking on arrows or by entering
the desired value in the field box. Note that if an invalid value
will be entered, the value will be automatically rejected and
replaced with the previous correct value. |
|
| Wave
time control |
 |
This control let
you set the amount of time the wave will operate. You can adjust
the length to maximum 59 min 59 sec. Setting the operating to 0 min
0 sec will produce no wave generation. |
The controls can be adjusted by clicking on the controls arrows or
by entering the desired value in the field box.
Note that if an invalid value will be entered, the value will be
automatically rejected and replace with the previous value. |
|
| Gate
control |
 |
The Gate control
allow you to generate a pulsed signal.
Basically the wave frequency in amplitude modulated with the low
gate frequency. The signal looks like train pulses of high
frequencies. Rife found that applying the wave in pulses some time is
more effective than plain wave.
When the switch is set to On you can adjust pulses frequency and
the duty cycle.
|
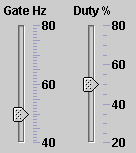 |
The duty cycle is
the ratio of signal present versus pause for a pulsed signal.
The higher the duty cycle, the shorter the pause between pulses.
You can adjust the
pulse frequency between 40 and 80 Hz. Most of the Rife protocols
use gating frequencies between 60- 70 Hz.
The duty cycle can be adjusted between 20 and 80 %. |
|
| Output
level control |
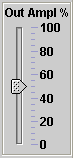 |
Sets the output
level of the generated signal. 100% is the maximum output level,
which is equivalent to 0db full scale. |
|
| Manual
Run control |
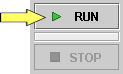 |
This control allow
the operator to start and stop the generator manually.
Run - start generator.
Stop - stop generator.
Note that after the set length of time was consumed, the generator
will automatically stop. |
 |
Off -
close the generator and dismiss it from the screen. You may use it
when multiple instances of the generator are selected, as you need. |
|
| Signal
Parameters Display |
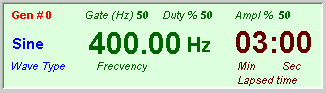 |
This
control displays signal parameters during run time. |
| It
will display the lapsed time, the frequency parameters. In Sweep
mode the frequency values is updated corresponding to lapsed time
at 1 sec increments. |
|
| Back
to Contents Table |
| 3. Manual Run |
|
|
Before start the generator, set the
wave shape, flat or sweep frequency, set the range and the initial
and final frequency. Also set the time the generator will operate,
gating and output parameters.
|
|
Click Run button
to start the generator. |
| Click Stop button
to stop the generator. |
| After
the generator starts you can dynamically modify the gating and
output parameters. There is 1 sec delay between changing the
controls and taking effect. |
|
| Back
to Contents Table |
| 4. Frequency Libraries |
|
This software
allows you to save and run sequences of frequencies with the pre
defined parameters.
|
| Definitions |
Sequence:
All the parameters assigned to a particular frequency constitute a
sequence. Sequence's parameters includes: wave shape, freq
range, freq from value and if in Sweep mode the to freq
value, running time, gate freq, gate duty and output amplitude.
Program:
You can group a set of sequences in a program which will address a
specific disease or condition.
Library:
A group of related programs can be structured in a library. |
You can structure your programs and libraries as you whish to
better serve your aims. Basically a library contains a
large number of programs and is stored in an file with xml extension. You can place this file anywhere in your computer file
system but is recommended to be placed in the ~/data
subdirectory of the Rife Machine Wave Generator.
As you develop more libraries you can structure the data directory
in several subdirectories where to store specific libraries based
on your criteria. |
Another format in which a library can be stored is a file with crs
extension. In this file the library will be stored in a encoded
format for more security as you might not want the file to be
modified outside application.
|
In order to create
a library the software come with the very easy usable Library Editor.
The download comes with an xml sample library. You can open the
file with and external xml editor and have a look at the xml
structure (scripts). After you become familiar with the structure
you can add or modify the programs with your preferred editor. But
still you have to pay attention at the structure of scripts
otherwise at loading time the file will throw errors and will fail
to load.
Note: It is not recommended to edit the encoded (crs) files in any
manner as they will become unusable (unloadable).
|
|
| Back to
Contents Table |
| 5. Library Formats |
|
| Frequencies
libraries can be stored in two file formats. |
a. XML format. The library is represented in XML format and
stored in a file with xml extension.
b. CRS format. The library is represented in XML format and
encrypted based on your key and stored in a file with crs
extension. |
|
| Back to
Contents Table |
 |
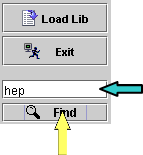 |
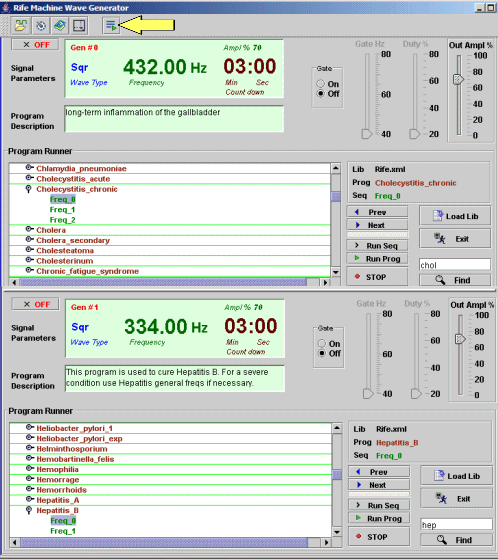
Click Load Library button and select a library file (a file
with xml or crs extension).
After loading the library, the library window will be populated
with the programs contained in the library. In order to run a
program, it has to be selected in the library window. But first
you might want to search for the specific program to run.
One way is entering first 2-3 letters of the program name
in field finder. And click Find button. If the program will be
found, automatically will get the focus. Hit again Find button for
the next occurence of another program starting with the same
letters combination. Or enter exact wording and click Find.
|
|
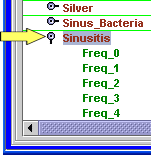 |
Another way to find the specific program to look for is using the
scrolls bar. Click on de desired program on the programs tree. In
order to run a program it has to have focus in the programs
window. |
|
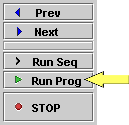 |
Click the Run
Program button from Program Runner navigator.
Here are the functions of the navigator buttons:
Prev - navigate one program up in the list.
Next - navigate one program down in the list.
Run Seq - run a specific sequence from the program.
Run Prog - run the whole program.
Stop - stop running the program or the sequence.
In order to leave the program mode click Exit button, the
interface will return to manual mode. |
|
| Back
to Contents Table |
|
|
|
 |
Click Edit
radio button on Generator mode control. |
Here is
the main Editor interface |
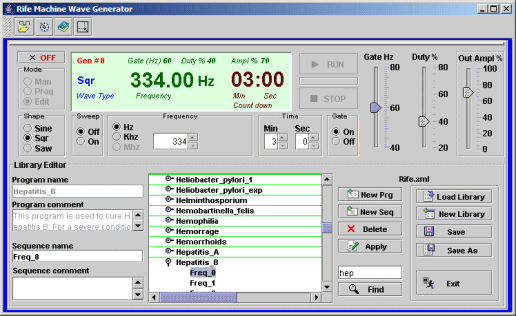 |
Top
module is the generator interface described in the previous
section. It is used to set the parameters for each sequence or
frequency within the program.
The bottom module is used to create, edit and delete programs. It
has 4 sections: |
|
| The
library section |
Load
Library - Click on this button to load an existing library. It
can be stored in a xml or a crs file. The crs file contain the
library stored in a encoded format. The library will be loaded in
memory and the programs window will be populated to be examined
and edited.
New Library - A new sample library will be created which
easily will be modified. After you will made the desired changes,
as adding new programs or new sequences, changing the sequences
frequency parameters, or names, you can save the library with the
different name as you planed. |
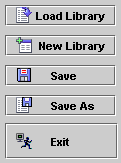 |
Save - save
the changes to the library.
Save As - You can save a new copy of the library with
another name. Note that a valid library name has to have xml or
crs extension. Otherwise you will not be able to reload it and
run it. Please note that if you prefer to keep a safer copy of
your research work or for any other reason you might want save the
library with crs extension which will encode the content of the
library based on your current key. Simply assign the crs extension
when saving the library. |
When a
library is loaded a consistent amount of information is loaded in
memory and if the computer has a low RAM it could slow down or
throw an out of memory error. Is recommended to keep a library no
longer than approximative 1000 programs. But you can structure your
research or practice in several libraries file or even more stored
in the specific directories, similar with a database.
Exit - Exit edit mode and return to manual generator mode
interface. If changes to the library are not saved you will be
asked to save them before exit. |
|
| The
program section |
This
section is used to handle the programs and sequences of
frequencies and navigate through them.
New Program - This button will add a new empty program in
the library tree. In order to add a program you have to be
positioned on a program node in the list. The new program will be
added below the current existing program. The name of the added
program will be New Program which you may modify it later on as
you desire using Comments module. If currently the focus in the
program tree is on a sequence this button will be ineffective.
After adding the new program entry you can add as many sequences
as you wish, by clicking New Sequence button.
New Sequence - This button will add a new sequence in the
program. If you are positioned on the program node in the tree,
clicking New Sequence will add a sequence at the bottom of the
sequences list belonging to the current program. If you are
positioned on a sequence node in the tree, clicking New Sequence
will insert a sequence below the current sequence.
|
 |
The new added
sequence will have New Sequence name which you might want to
change later on using the Comments module. Note that when you add
a new sequence, this will contain a whole parameter frequency set.
In another words a fully runnable sequence. Before adding a new
sequence you might want to change the parameters to be stored
accordingly with your scope. Or later on you can change them and
restore them in the sequence by clicking Apply button.
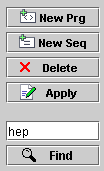
Delete - This button will delete an entry in the tree. If
you are positioned on the program node, by clickin Delete the
whole program containing all frequency sequences will be deleted.
You will be prompted for deletion but use with cautions. If you
are positioned on a sequence node in the tree, only that specific
sequence belonging to the program will be deleted. Note that you
cannot delete a library. A library is a file in the file system.
And can be deleted by the operating system Delete File command.
|
Apply
- Use this button to apply the changes made to a program or a
sequence. The following parameters are applicable. Program name,
Program comment, Sequence name, Sequence comment and all frequency
parameters, including sweeping gating and amplitude.
Find - When the library gets larger you might want to
quickly access a specific program. Enter first 2-3 letters of the
program name in field finder and click Find button or hit enter
taste. If the program will be found, automatically will get the
focus. Hit again Find button for the next occurence of another
program starting with the same letters combination. Or enter exact
wording and click Find. |
|
| The
library tree window section |
 |
You can browse from
programs by handling the scroll bars. Click on the specific
program handler to open the sequences list. Click an a sequence
and observe the parameters in the Top Parameters module. If
necessary make the changes on the sequences parameters. Or change
the program and sequence name and comment properties. Click Apply
button to made permanent the changes. Note that an undo mechanism
is not available at this point. But you can discard the changes by
reloading the library without saving. |
|
| The
comment section |
 |
Each program and
sequence are identified by a name and a comment property which you
might want to update and refer later on at run time.
|
|
| Back to Contents Table |
| 8. How to Create, Edit and Save a
Library |
|
| Note: Here we present two
samples which cover most of the editing cases. These samples are pure
educational and are not intended to suggest any medical advice. |
|
| 1.
First example describe how to create a new library, how to add a
new program, how to add a sequence to the program and how to save
the library with a specific name. |
|
|
Click
Edit radio button on the Mode switch. The Editor interface will
open. |
|
 |
Click
New Library button. Notice that in the Library Window the
"LibrarySample" in xml format will be created. |
|
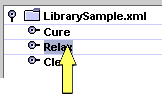 |
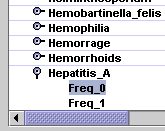
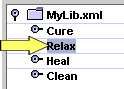
The
library has already 3 programs named: Cure, Relax and Clean. Click
on the Relax program. It will get focus in the tree. |
|

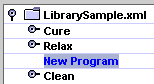 |
And
click on the New Prg button. A new entry with New Program name in
blue color will be created below the Relax program.
|
|

 |
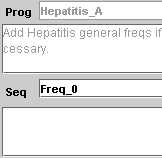
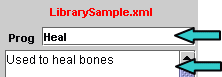
In the
Prog field change the name of the program to "Heal". And in the
notes field enter: "Used to heal bones". And finally click on the
Apply button. The changes will take effect and the tree will be
updated. Also the program and library name color will change to
red. This signify that a change took effect. |
|

 |
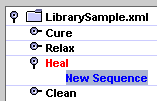
Right
now you've created an empty program. While the "Heal" has focus on
the tree, click on the New Seq button. Under the Heal program a
new entry with the New Sequence was created in blue color. In the
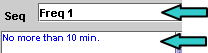
Seq field enter Freq 1. And in the Notes field enter "Use no more
that 10 minutes". |
|
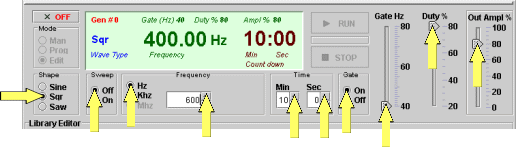
Now, change the frequency
parameters in the Generator interface as follows.
Set the wave shape to SQR.
Set the sweep switch to Off.
Set the frequency range to Hz and the frequency to 600.
You can either enter the value in the field or handle the up or
down arrows .
Set the time to 10 min 0 sec.
Set the gate On.
Set the gate freaquency to 40 Hz and the duty to 80%.
Set the output amplitude to 80%.
|
 |
|
|
And
finally click again the Apply button. |
|
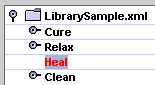
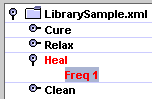 |
The
library window should look similar as below. |
|
Navigate
between programs, click on the programs and navigate among
frequencies sequences. Notice how parameters in the Generator
interface change accordingly.
Go back to the Heal program and click on the first sequence.
Notice the new created sequence and check the correctness of the
parameters. |
|

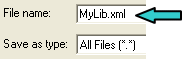 |
You
are ready to save the library. Click on Save As button and enter
as name to be saved "MyLib.xml". |
|
 |
After
you finish all the edits and saving the library you may want to go
back to the generator main interface. Click on the Exit button. |
|
| 2.
Here is the second example describing how to delete a program, delete a
sequence, change the parameters of an existing sequence and save
the library. |
|
|
click Edit radio
button on the Generator Mode switch. The Editor interface will
open. |
|
 |
Click on Load
Library button. And select previous selected MyLib.xml library. |
|
 |
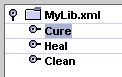
The library should
display 4 programs: Cure, Relax, Heal and Clean. Click on Relax
program. Notice that it gets the focus. |
|

 |
And click Delete
button. You will be prompted to acknowledge the deletion. Click
Yes. Notice that the library tree was updated and the library name
changed to red. This signify that a change took effect. |
|
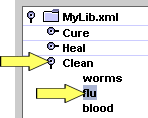 |
Click on the Clean
handle program (the + or lock sign , depending on the look and
feel configuration).
The program will display: worms, flu and blood sequences. And
click on the blood sequence. Notice that the sequence flu
got focus. |
|
|
Click on Delete
button and acknowledge the deletion. |
|
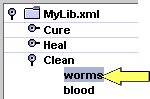 |
Notice how the
library tree will update the situation. And now click on the worms
sequence. |
|
 |
In the Generator interface change the parameters as follows:
Set the frequency range to Khz.
Set the frequency to 1.50.
|
|
|
Click the Apply
button. |
|
| Navigate
between programs an get back to Clean program worms sequence.
Notice the changes you've made to the frequency. |
|
 |
Click on Save
button. |
|
|
After clicking on
Exit button you will navigate to the generator main interface. |
|
| Back to Contents Table |
| 9. How to run synchronously multiple
programs |
|
| This
option is provided for improved performance and greater
flexibility. |
 |
You may use this option to apply 3 distinct programs or
combinations of programs and single frequencies at a one time. The
generators can synchronously be started and stopped using the
synchronization button. |
|
Here is an example how to run simultaneous two programs. To use
this option you have to own a full licese version of the generator.
When you start the application one generator is automatically
started. |
|
To instantiate one more generator click on the New
Generator button from the control bar. 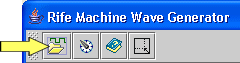 |
|
Switch in Prog mode for the generator #0. Load the
Rife.crs library. Search for cholecystitis program and
make sure that it gets focus on the library tree (is highlighted).
Switch in
Prog mode for the generator #1. Load the same library.
Search for hepatitis program and make sure that it get focus on
the library tree (is highlighted) |
|
Right now you are ready to simultaneously run the
programs.Once the second generator displayed the interface, a new
button with the Run symbol is added to the control bar. This
button has the role of synchronously start the generators.
Go back to the control bar and click this button. Both generators
will start at the same time but running the two different
programs.
 |
|
If one of the generators is in program mode and the
library tree doesn't have focus on any program, an error message
will be thrown alerting you to select a program to run.
The programs might have different lengths. As one program will
complete the corresponding generator will automatically stop,
while the other will still run.
Once the generators have started the Run Synchronized button will
change the function to Stop Synchronized all generators. Or it is
possible to stop them one by one as you consider using their own
Stop Program buttons. |
Click the Stop Synchronized button to stop the
generators.
 |
|
| For more flexibility, during the run time is
possible to manual control the gating and amplitude parameters. |
|
Back to Contents Table |
|
10. Signal Configuration |
|
| These
settings are designed to help you generate tones at the optimum
quality level given your computer processing performance. The
faster your computer, the higher is the quality of sound and
'responsiveness' of the controls while playing a tone. |
 |
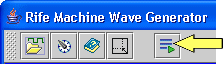
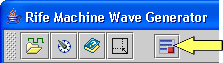
Click on Config Signal button from the control bar.
|
|
 |
The Config Signal Window will open.
|
|
Output Device - This option is not available in this
version. It will default to first audio device currently assigned
by operating system.
Sample rate - the available values are 8000, 11025, 16000,
22050, 44100. Adjust these values accordingly to the maximum
sample rate supported by your sound card. If the signal sound
choppy it might be necessary to adjust the sample down one step.
Note that the high limit frequency depends on the sample rate. By
shifting down the sample rate you will affect the high limit. And
is possible that some sequences of frequencies to be ineffective.
In respect of this situation it is recommended to upgrade your
system with a high quality 16 bits sound card. The higher sample
rate supported the better.
Channel number - The generator can output the signal to two
audio channels. If 1 channel is selected the signal will be output
to the two standard stereo channels. If 2 channels are selected
the output can be redirected to Left or Right audio channel.
Channel output - select the output channel.
Note: The signal config parameters affects all the
generator instances. However the changes will occur next time when
a new sequence or a program will be started. |
|
| Back
to Contents Table |
|
11. Software versions |
|
The install kit contains all the available versions and
documentation including a free evaluation version.
The free version require a free activation key. You can run it as
long as you wish.
The basic and full versions require an activation key to be
purchased.
However to benefit from the advanced features you have to purchase
an activations key which comes in two levels: basic and full.
Here is the activation key schema:
Free version - contains all basic manual functions as
follows: Sine, Square and Saw wave shapes control, Flat frequency
control, Frequency Range control (hz, kHz), Time control,
Amplitude control, Signal configuration and Manual Run control.
Basic version - all free version features. In addition,
multiple instances (max 3), sweep and gating options will be
available.
Full version - in addition to basic option the Program Runner
and the Library Editor modules will be available.
Upgrade version - upgrade from basic to full version key.
Read next chapter to find how to order the activation key.
|
|
| Back
to Contents Table |
|
12. How to download, install
and start application |
|
Install Kit
components
The install kit contains all the available versions and
documentation including a free evaluation version.
In order to run the generator you need an activation key. The free version requires a free activation key. The basic and
full versions require an activation key to be purchased.
Download
The software is developed in Java. In order to run a Java program
is necessary to have installed Java Runtime Engine (JRE) on your
computer. Many of today's software use it and you already might have
it installed. Simply download the Generator installation kit,
install it and run it. The minimum Java Runtime version required
is 1.4 but it will work on higher versions too.
There is no guaranty that program will work correctly with
Microsoft JRE version. Make sure your JRE provider is Sun
Microsystems.
http://java.sun.com/products/archive/j2se/5.0_11/index.html
If you do not have a Java Runtime Engine installed you can
download the generator software kit which already contain a Java
Runtime version 1.4. The engine will be available only to the Rife
Machine Wave Generator and will not interfere with other software
from your computer.
If you don't have JRE installed on your computer you can download
the last version for free from
http://www.java.com/en/download/index.jsp
How to install Rife Machine Waves Generator* - Windows version.
Once you’ve downloaded the installation kit, create a folder
with a suggestive name, and unzip the installation kit in this
folder. The package will unfold in the wavegen folder.
Example C:\Generator\wavegen\..
How to start Rife Machine Waves Generator* - Windows version.
In the wavegen folder you will find a batch file named run.bat. If
you download the Java Run Time containing kit you will find
run_jre_local.bat batch file instead. Double click on this file lo
run the generator.
Note that the generator application can run only one instance at
the time. Make sure that the port 9623 is not used by other
program or blocked by the fire wall.
|
|
| Back to Contents Table |
|
13. How to enter the activation key |
|
 |
Once you have received the email containing the key, you can
activate the software by entering the key in the About
window. Start Rife Generator and click on the About button from
the control bar.
|
|
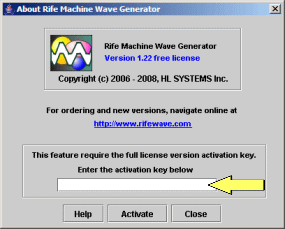 |
When the About window open, enter the key in the activation field. Or you can Copy and
Paste it from the email.
Be sure that the key doesn't have any extra space before the start
or end of the key.
Click Activate button. If the key was successfully entered a
confirmation message will pop up and the features corresponding to
the key level will be activated. Note that the free version also
require an activation key. Navigate online at
www.rifewave.com, Downloads page to get your free activation key. |
|
| Note:
Keep the key in a safe place or save the email containing the key.
If you will need to reinstall the generator in a different
directory or computer you will have to re - enter the activation
key. |
|
| Back
to Contents Table |
|
14. How to order the activation key
|
|
Navigate online at www.rifewave.com, Buy page to order the
activation key for basic, full and upgrade versions. You can pay with
major credit and debit cards via PayPal's secure server. Once you have
purchased the key online, it will be sent by email
immediately. You can enter the key in the ‘About’ window, and the
program will become fully functional right away.
|
|
|
Back to Contents Table |
|
15. Disclaimer |
|
|
The Rife Devices
are not approved by FDA, but are considered to offer an alternate
solution.
This software is
provided for research and testing purpose.
Before using this
alternate technology you should consider an authorized medical
advice. You first should inform yourself on the bio resonance or
bio energy domains. Do understand that this is a new evolving
technology which is in early stages of the development.
The development
company and the authors of this software will not be held
liable for any damages on your body, mind or any other types of
damages, as a result of using this software, or as a result of
using this software in combination with any computer hardware,
computer accessories or other electrical or non electrical devices
or hardware.
Also the
development company and the authors of this software will not
be held responsible or liable for any unexpected results or any
other possible side effects as the result of applying energy waves
on your body, by any methods described or not described here.
You use this
technology at your own risk!
|
|
Back to
Contents Table
|
|
doc ver 1.3
|
|